First I want to write about Don McCullin. McCullin's work interesting for me because of the way he documented England in the late 50's and 60's. He took pictures of the London gangs and the homeless people of the area. He's work on vietnam and cyprus is also interesting, because he covered pretty much of these conflicts. He's photos are strong and very emotional. He's friendliness and honest way of approaching people is visible on them pictures. His documentary work is interesting to me. How to document people in their own environment even if they live in a big city like London or an area torn by a conflict like Cyprus.

Don McCullin also shot landscape pictures mostly on black and white film. He shot this picture early morning in Hartlepool. For me this picture is more like a portrait than an industrial landscape. Probably because of the man who makes me think he works hard for his money even in this hard environment. Early morning heading into the factory. The composition of the picture is just catches my eyes. In the background the chimneys blowing smoke in the air drawing lines on the sky. In the foreground the man heading to work. No trees and nothing friendly on this framing. Look like a very cold and tough place especially when I'm sitting in my comfy, warm room front of my laptop.
References: Don McCullin, England 1960s
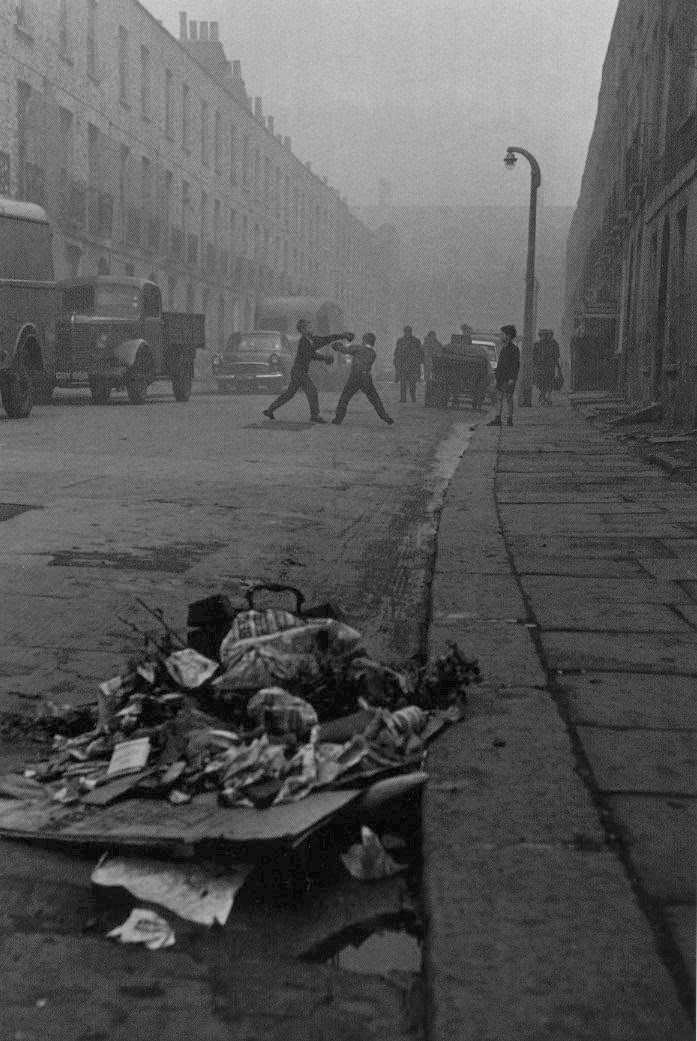
McCullin is well known about his work in Vietnam and Cyprus covering conflicts. But for me the most interesting in his work is the social documentary part. Photographing everyday's war against poverty and documenting some people life in bad circumstances could be interesting. This picture for me is one of my favourite from his book. He shot this picture in portrait format so the garbage on the bottom of the frame attracts the eye first. Then the roadside leads my eye up a bit where I can see these children 'playing'/boxing. So when I have a look at the central of the frame I see these little guys boxing each other. What makes me believe this area could be a little bit more rough than other parts of London. I'm sure McCullin couldn't catch similar moments in any posh areas of the capital. I think it could be a late afternoon when children playing outside their home. What I don't like in this picture is the depressing atmosphere what McCullin describes well with working on black and white film and the dirty street scene.
Because I'm more likely interested in this kind of work, Don McCullin is one of my influential photographer. So when I go out to the streets I try to find similar stories like his.
Because I'm more likely interested in this kind of work, Don McCullin is one of my influential photographer. So when I go out to the streets I try to find similar stories like his.
The next photographer would be Andre Kertesz. Kertesz work was known of his groundbreaking contributions in composition. The main reason I like his photography is because of this.

References: Andre Kertesz, 1920's
He took this picture in Meudon, France. The composition of straight lines lead the eye of the viewer in the middle of the picture. Well captured moment when the train is in the picture at the same time when the man who carries a painting steps into the frame. One of the main reason why I like Kertesz's photography is because of the composition. But also the patience how he took them photos what I would like to learn of their photography. With the composition Kertesz could create a lively atmosphere in the otherwise quiet street.

Reference: Andre Kertesz, photographs
This picture of the chairs in Paris is also a good example for Kertesz's vision of composition. I think the way he shot this picture by composing the horizon slightly above the half of the frame and chairs in the foreground gives a nice rhythm to the picture. Also the lamp posts in the background and the trees. He was waiting for someone to cross the street and give a little life to the picture. In my opinion Kertesz's photographs are very calm and silent. Kind of polite how he approaches street photography. Mainly focused on the elements and composition on his photographs. Compare to my last chosen photographer where I think the different is huge.
My last chosen photographer would be William Klein. He also used black and white film. His approach to street photography was something new. He used wide angle because he liked to go in close to fill the frame. This is also one thing what I've learnt of Klein's work to get in close. I think that what makes a great street photograph or social documentary picture. Work from inside to show every detail it is like being in the situation for the viewer itself. He photographed the people of New York and the block where he used to live. About a year ago bbc broadcasted a short movie about his life and work, and I've found it pretty interesting. Klein's way to approach his subject is very interesting to me because I would like to learn how to be that confident to work with people like he did. That's why I chose him as one of my influential photographer.

So one of my favourite photo of Klein is this one which he took on St. Patrick's day in New York. First when I have a look at the picture it is a little bit awkward for me. But when I try to understand I just get into further and further. First of all the depth of the picture what grabs my attention. I can see the lady stepping in the frame. She stepped into the frame where everyone is wearing black coats she wears a bright one what creates a big contrast. Because Klein was using a wide angle lens to fill the frame he could also catch the crowd looking into another direction. For me it creates a movement and a contrary between the movements. People are looking at something in the same direction while the lady completely switches the direction by moving the other way. I don't know how Klein caught that moment but his vision of photography and composition is just fascinates me.
So that would be my 1000 words of my 3 photographers.

References: Andre Kertesz, 1920's
He took this picture in Meudon, France. The composition of straight lines lead the eye of the viewer in the middle of the picture. Well captured moment when the train is in the picture at the same time when the man who carries a painting steps into the frame. One of the main reason why I like Kertesz's photography is because of the composition. But also the patience how he took them photos what I would like to learn of their photography. With the composition Kertesz could create a lively atmosphere in the otherwise quiet street.

Reference: Andre Kertesz, photographs
This picture of the chairs in Paris is also a good example for Kertesz's vision of composition. I think the way he shot this picture by composing the horizon slightly above the half of the frame and chairs in the foreground gives a nice rhythm to the picture. Also the lamp posts in the background and the trees. He was waiting for someone to cross the street and give a little life to the picture. In my opinion Kertesz's photographs are very calm and silent. Kind of polite how he approaches street photography. Mainly focused on the elements and composition on his photographs. Compare to my last chosen photographer where I think the different is huge.
My last chosen photographer would be William Klein. He also used black and white film. His approach to street photography was something new. He used wide angle because he liked to go in close to fill the frame. This is also one thing what I've learnt of Klein's work to get in close. I think that what makes a great street photograph or social documentary picture. Work from inside to show every detail it is like being in the situation for the viewer itself. He photographed the people of New York and the block where he used to live. About a year ago bbc broadcasted a short movie about his life and work, and I've found it pretty interesting. Klein's way to approach his subject is very interesting to me because I would like to learn how to be that confident to work with people like he did. That's why I chose him as one of my influential photographer.

So one of my favourite photo of Klein is this one which he took on St. Patrick's day in New York. First when I have a look at the picture it is a little bit awkward for me. But when I try to understand I just get into further and further. First of all the depth of the picture what grabs my attention. I can see the lady stepping in the frame. She stepped into the frame where everyone is wearing black coats she wears a bright one what creates a big contrast. Because Klein was using a wide angle lens to fill the frame he could also catch the crowd looking into another direction. For me it creates a movement and a contrary between the movements. People are looking at something in the same direction while the lady completely switches the direction by moving the other way. I don't know how Klein caught that moment but his vision of photography and composition is just fascinates me.
So that would be my 1000 words of my 3 photographers.


